Non-TCF Tags Integration (Pausing & Executing) - Google Tag Manager
Effective integration of user consents with Google Tag Manager (GTM) requires a deep understanding of the mechanisms available to ensure that tags fire according to precise user consent decisions. This article explores advanced approaches for leveraging user consent settings in GTM for publishers, extending beyond basic configurations to sophisticated integration strategies that uphold user privacy and functionality.
Method 1: Using Built-In Additional Consent Checks
For publishers who have enabled Google Consent Mode support in Clickio CMP, integrating additional consent checks within GTM can significantly enhance the management of user consents. This method integrates seamlessly with Google's Consent Mode, ensuring all Google tags align with user consents.
- Simplicity: This integration is straightforward and does not require creating separate triggers for each Tag.
- Limitations: Limited to Google's predefined consent states, which may not cover all custom or non-Google vendor requirements. Additionally, this method does not allow targeting based on Clickio non-TCF purposes IDs and non-TCF vendors IDs.
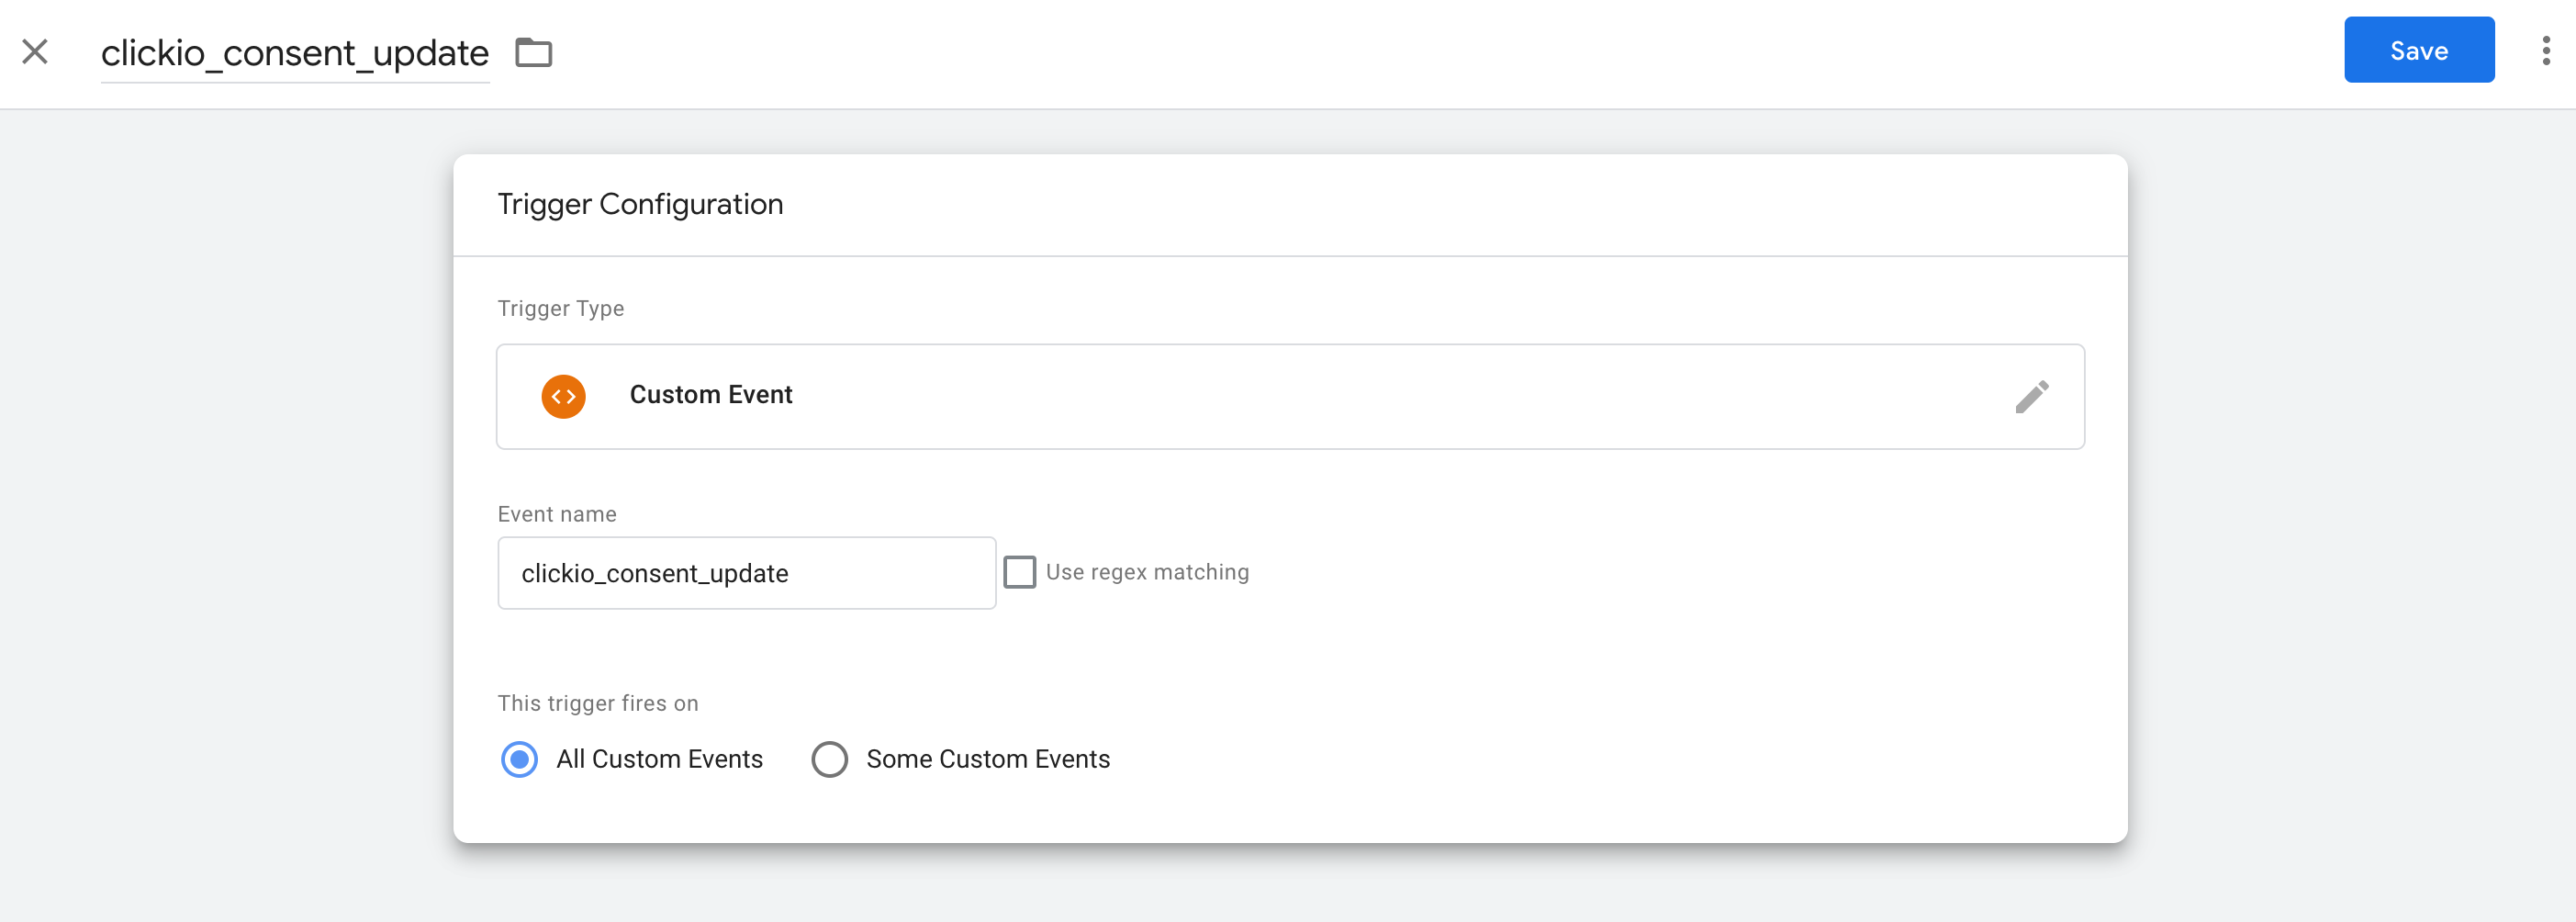
1. Set Up Custom Trigger
Create trigger that respond to the clickio_consent_update event.
clickio_consent_update event is fired by Clickio CMP under the following circumstances:
- There is a change in consent states.
- After the page loads, reflecting any previously stored consent decisions.
Steps to set up the trigger:
- In the GTM dashboard, go to "Triggers" and click "New".
- Choose "Custom Event" as the trigger type.
- Set the event name to
clickio_consent_update. - Save the trigger.
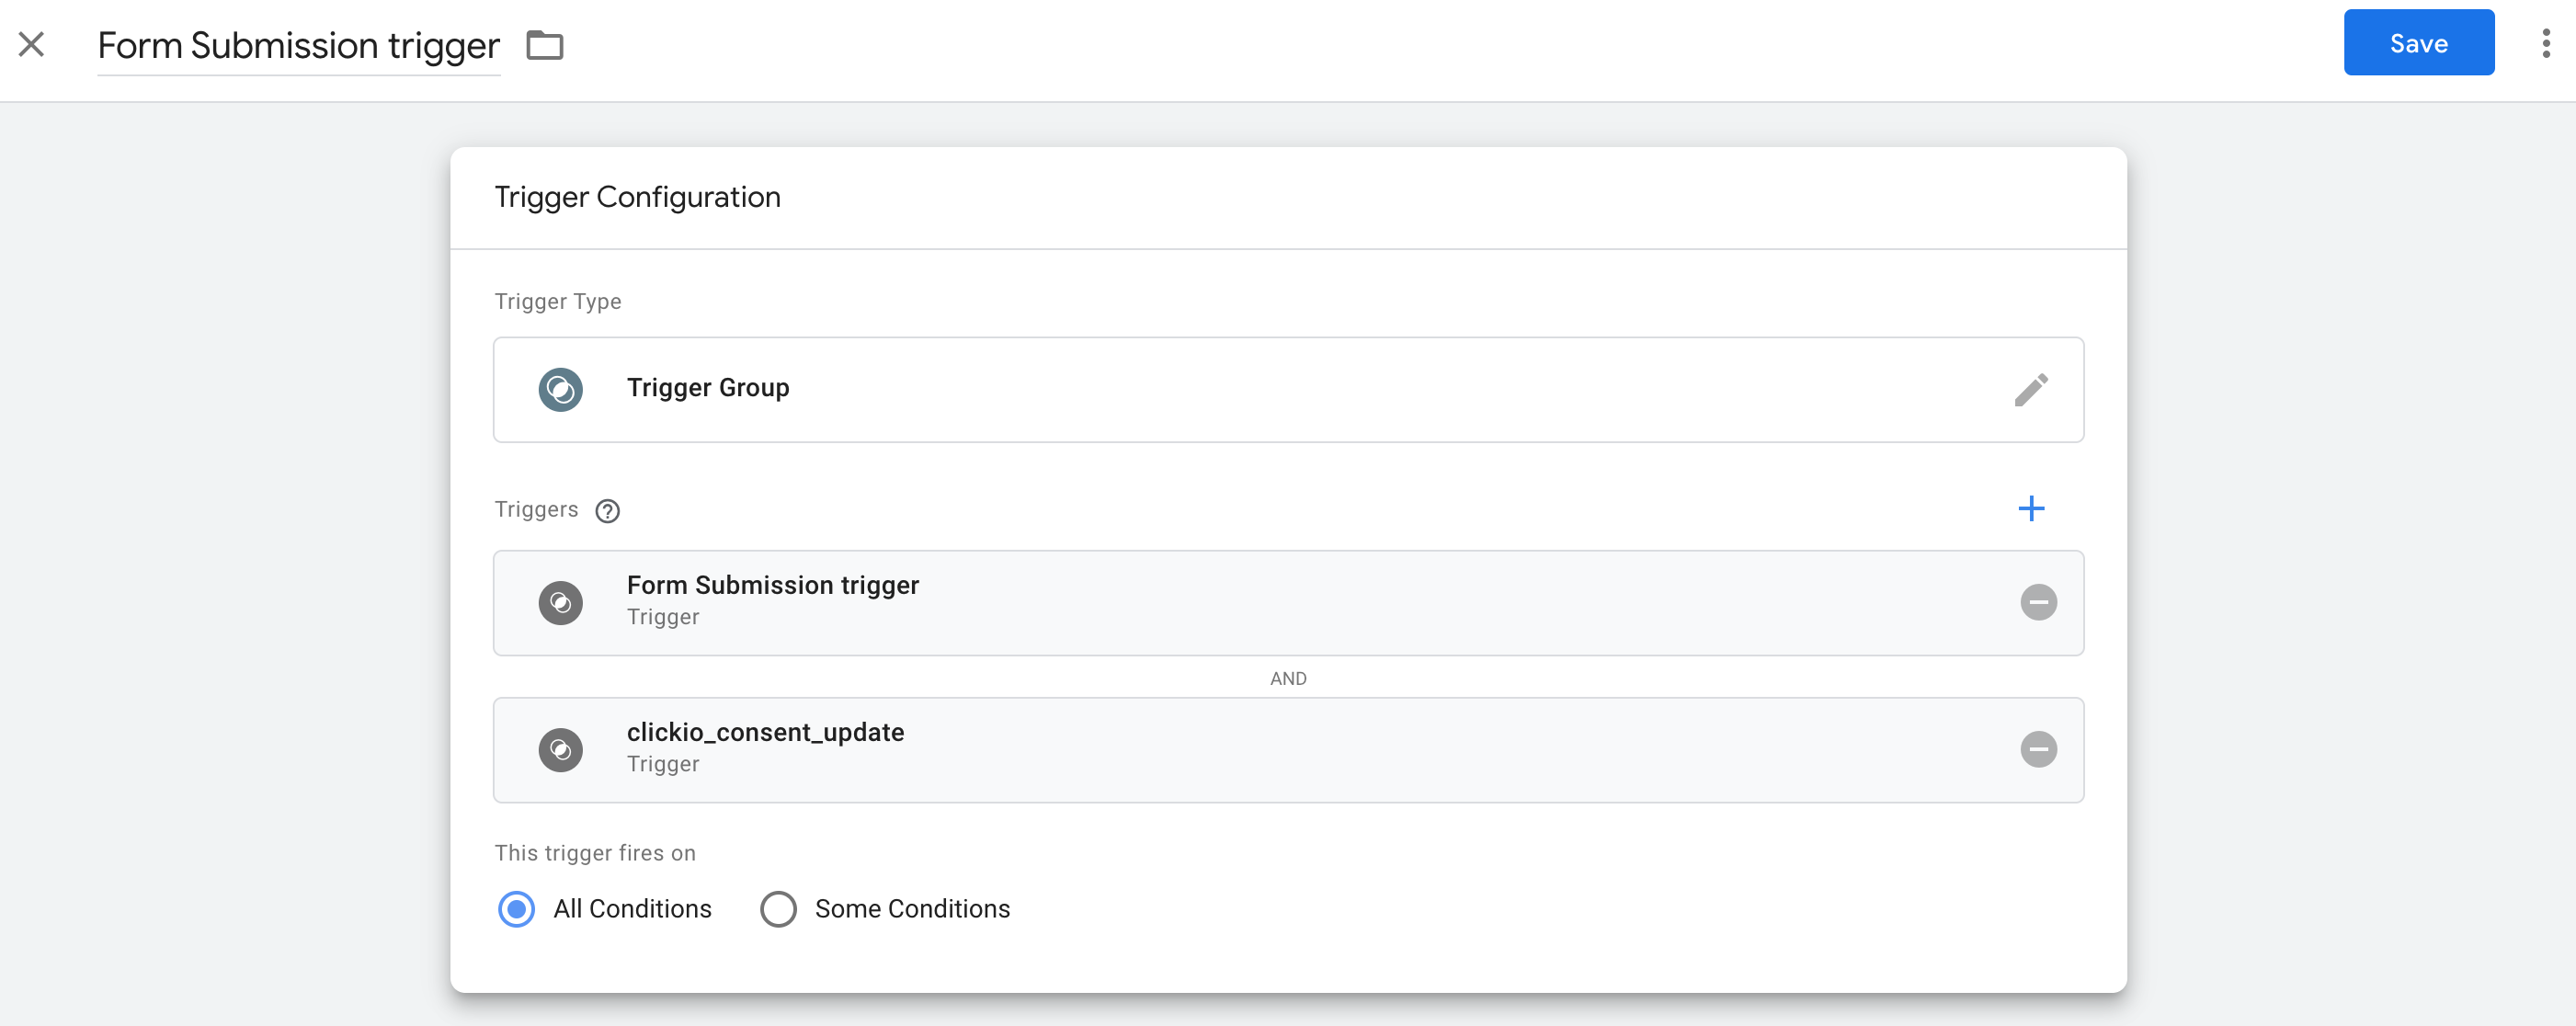
2. Grouping Triggers for Complex Tag Management
Sometimes, a single tag might need to meet multiple conditions before firing. Grouping triggers can be beneficial in these cases.
Steps to group triggers:
- Create a trigger
clickio_consent_updateas described above. - Go to "Triggers" and click "New" to create a new trigger group.
- Add the relevant triggers to the group. For example, you can combine the trigger based on
clickio_consent_updateevent with another trigger, such as a Form Submission trigger, depending on your specific requirements. - Set the trigger group to fire only when all conditions in the group are met.
- Set the trigger group name
- Save the trigger group
3. Change Triggering of your Tags
-
Log in to your GTM account, go to the "Tags" section, and select the tag you need to modify.
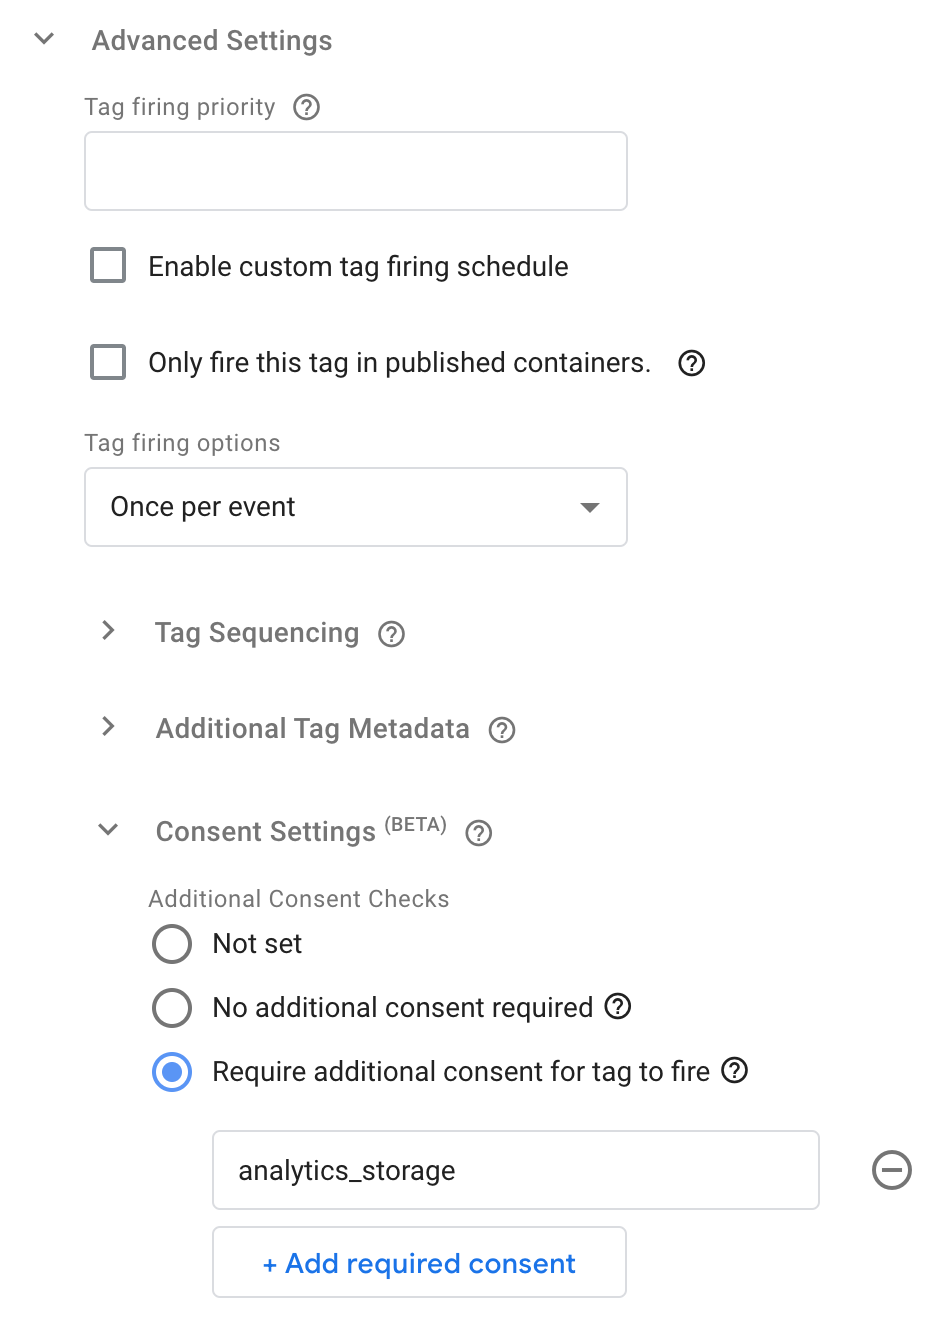
- Open "Tag Configuration > Advanced settings > Consent Settings > Additional Consent Checks". Choose "Require additional consent for tag to fire" and specify the particular Consent Mode variables for which consent needs to be verified.

- At the bottom of the tag configuration page, you'll find the "Triggering" section. Click on it to edit the tag's trigger settings. Remove the existing trigger and add the previously created
clickio_consent_updatetrigger or a Trigger Group that includes your existing trigger and theclickio_consent_updatetrigger.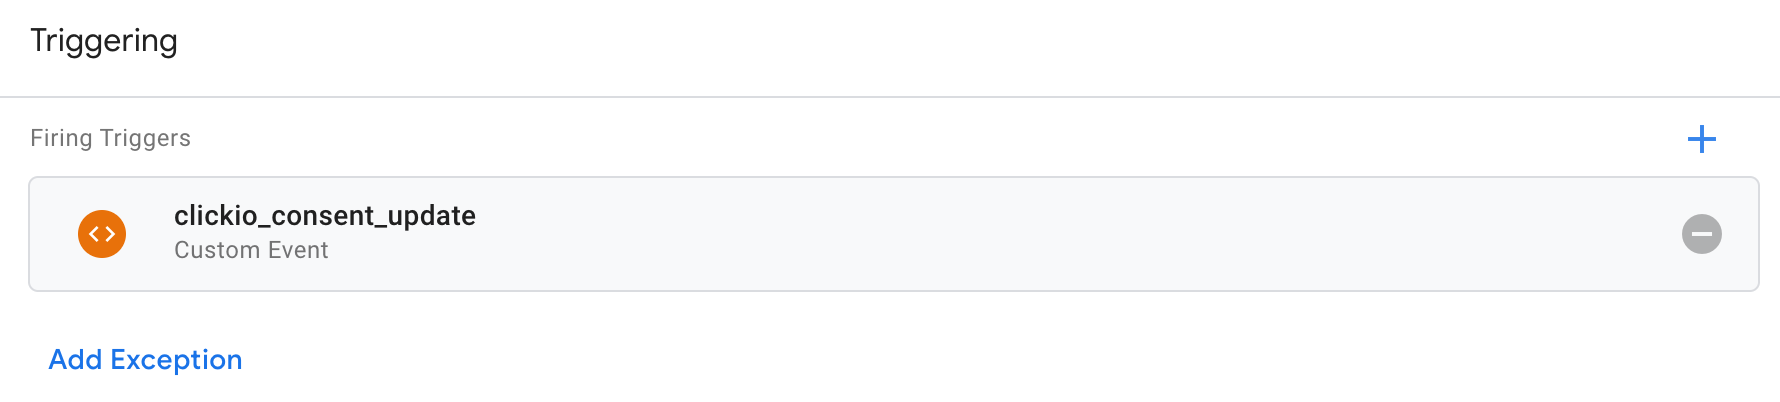
- Save your tag configuration.
- Use GTM's preview mode to test the modified tag thoroughly. This step is crucial to ensure that the tag behaves as expected under various consent scenarios.
- Once satisfied with the setup and the outcome of your tests, publish the changes in GTM to apply the modifications to your live website.

Method 2: Using DataLayer Variables
This method involves creating custom triggers based on dataLayer variables that represent consent decisions for non-TCF vendors. It provides a flexible framework for managing non-Google and custom tags in accordance with detailed consent preferences stored in the dataLayer. While this approach is more complex than the first, as it may require the creation of individual triggers for each tag, it allows for precise targeting based on Clickio non-TCF purposes IDs and non-TCF vendors IDs.
1. Create DataLayer Variables in GTM
Before setting up triggers, it's essential to create variables in GTM that will capture the consent states from the dataLayer. Clickio CMP automatically pushes these states to the dataLayer, making them available for GTM to use as trigger conditions.
Steps to create variables:
- Go to Google Tag Manager and log in to your account.
- Choose the relevant container for the website.
- Navigate to "Variables" from the left sidebar and click "New".
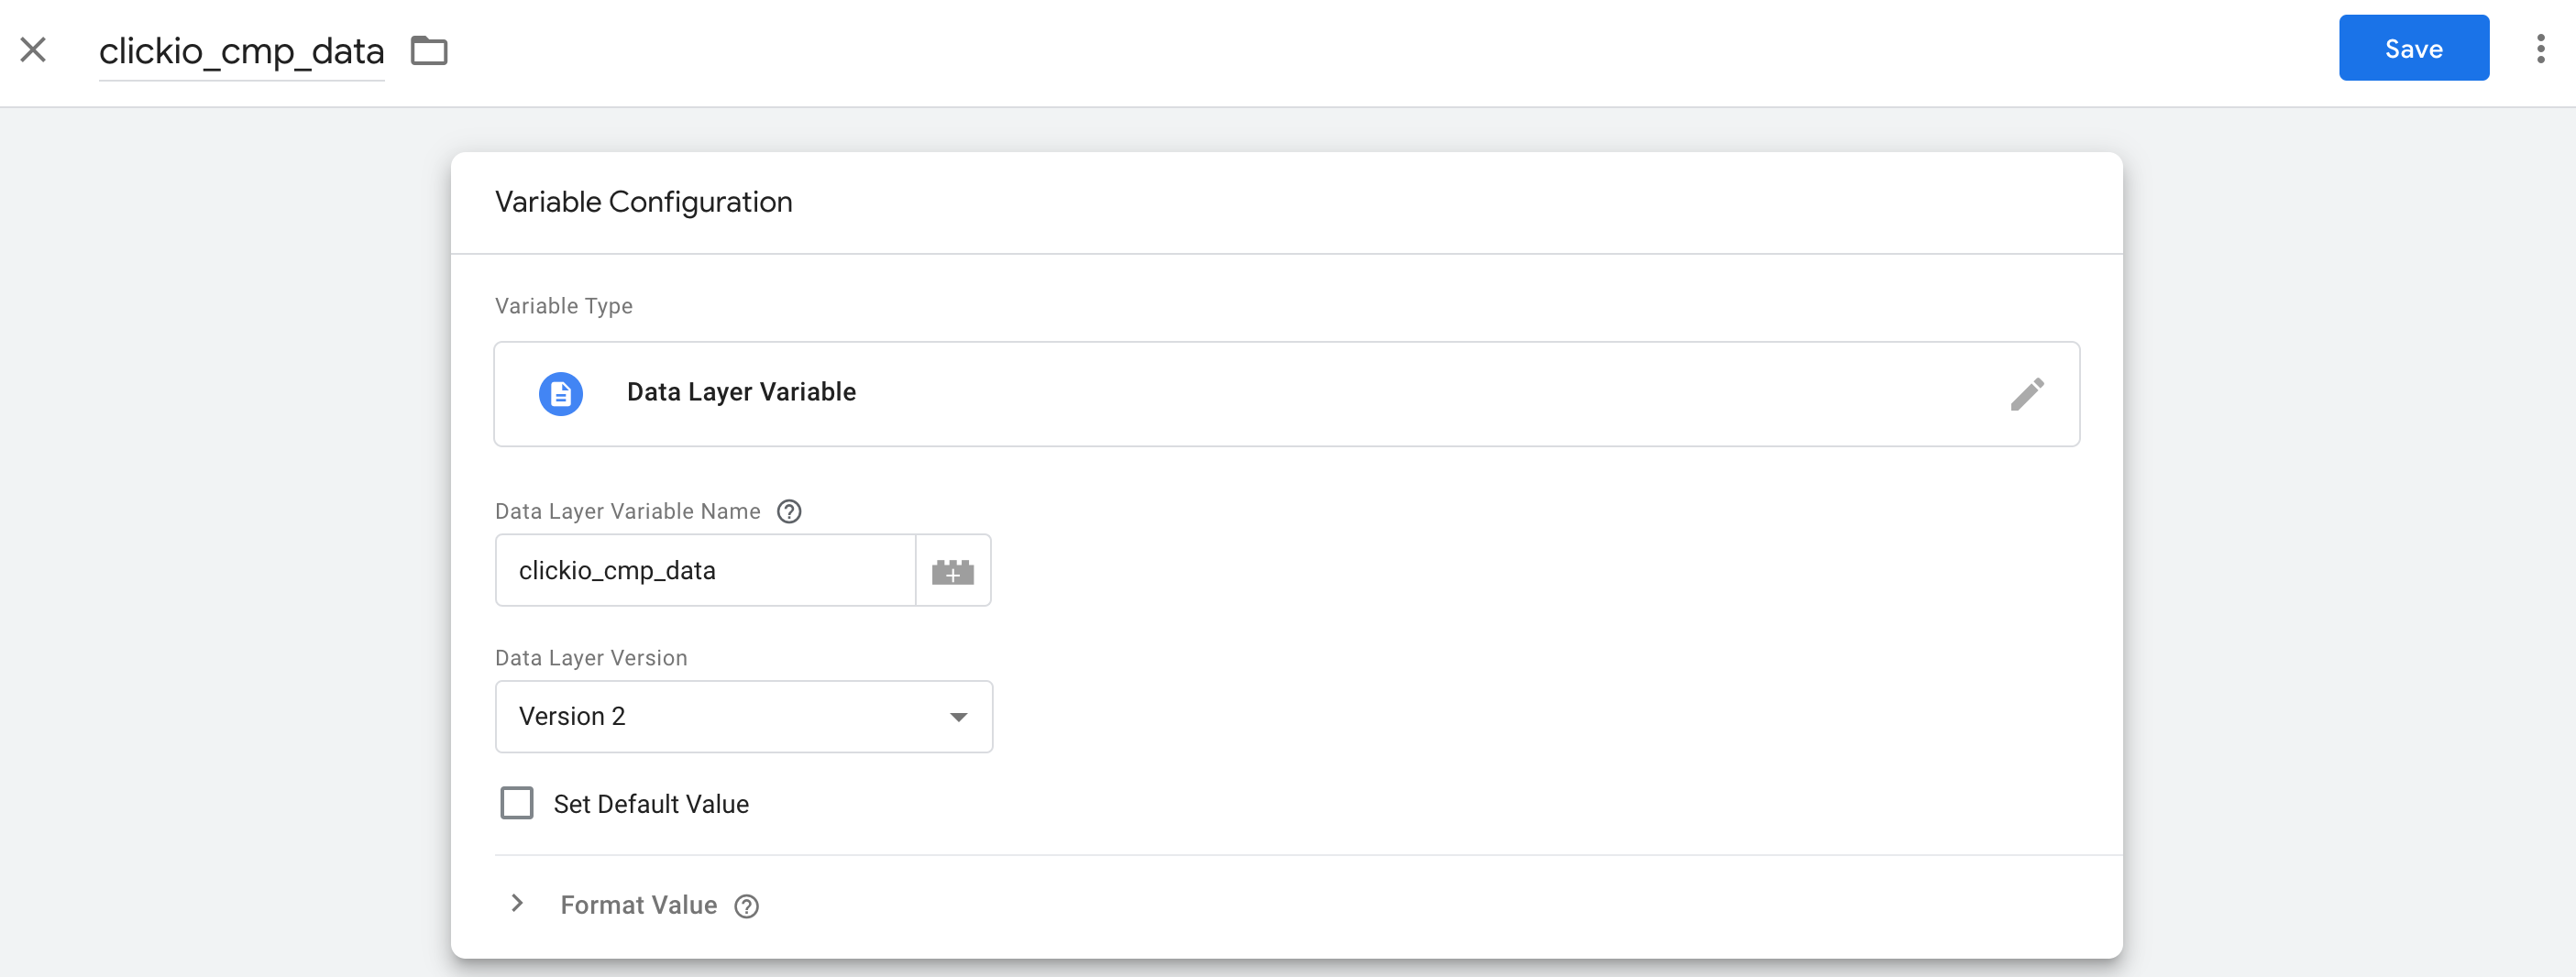
- Select "Data Layer Variable" for the variable type.
- Set the Variable Configuration name and "Data Layer Variable Name" field to
clickio_cmp_dataand save.
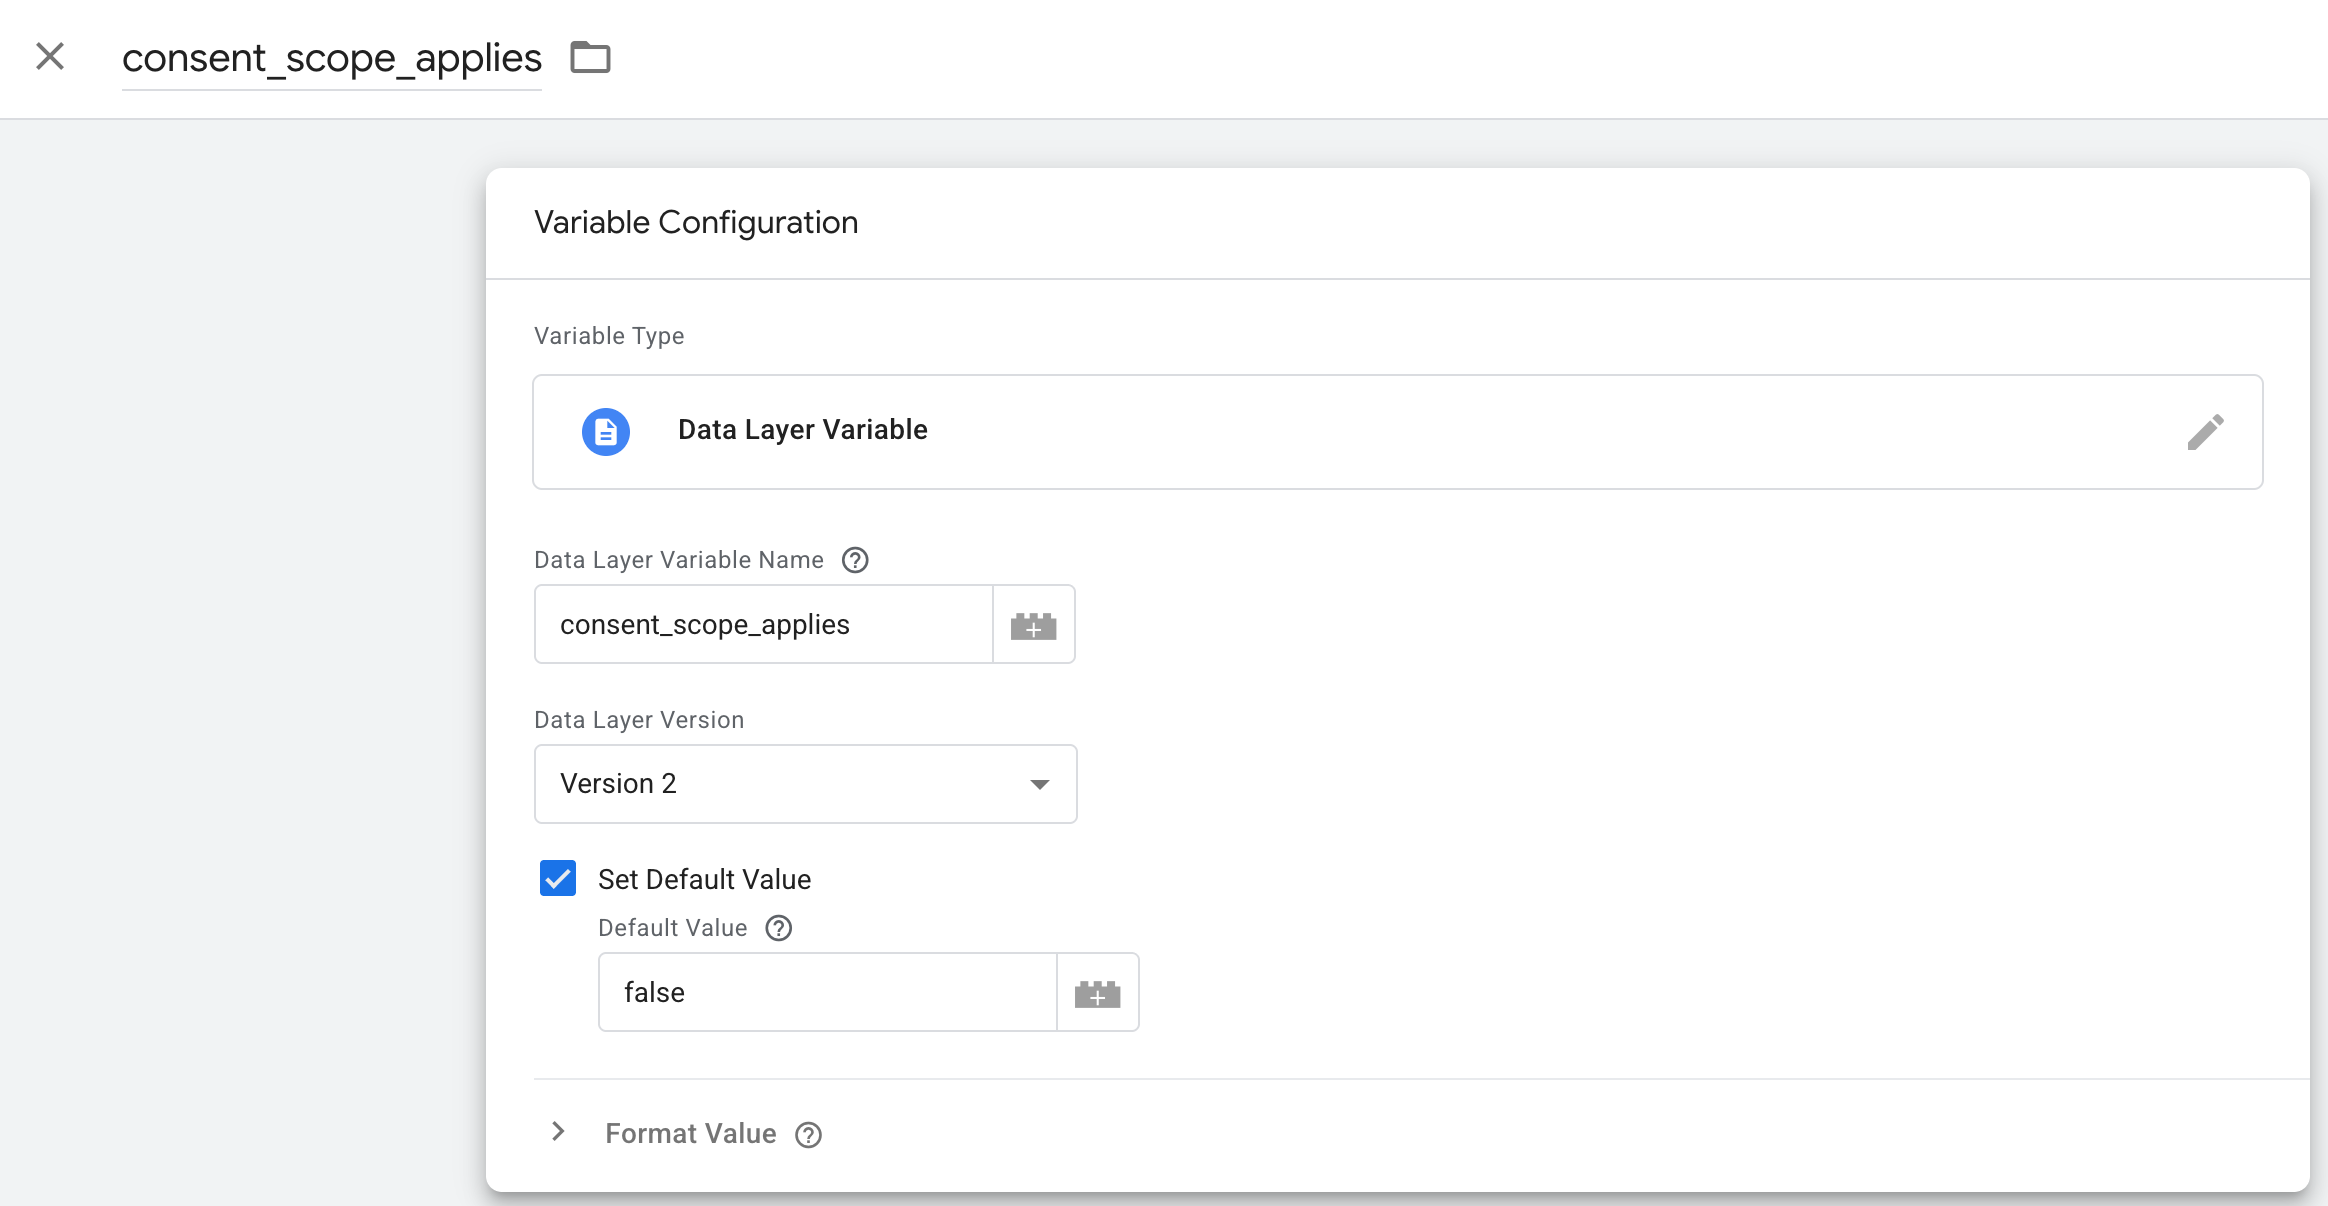
(Optional) Repeat the previous steps to add the consent_scope_applies custom variable
If your setup includes the "Consent Scope: Only EEA, UK, and CH users" mode, this variable is useful if you prefer not to conduct consent checks for users outside these designated areas. Setting up this variable allows you to tailor your tag firing logic based on the user's geographic location, optimizing the implementation of consent-related configurations.
Set option "Set Default Value > Default Value" to false
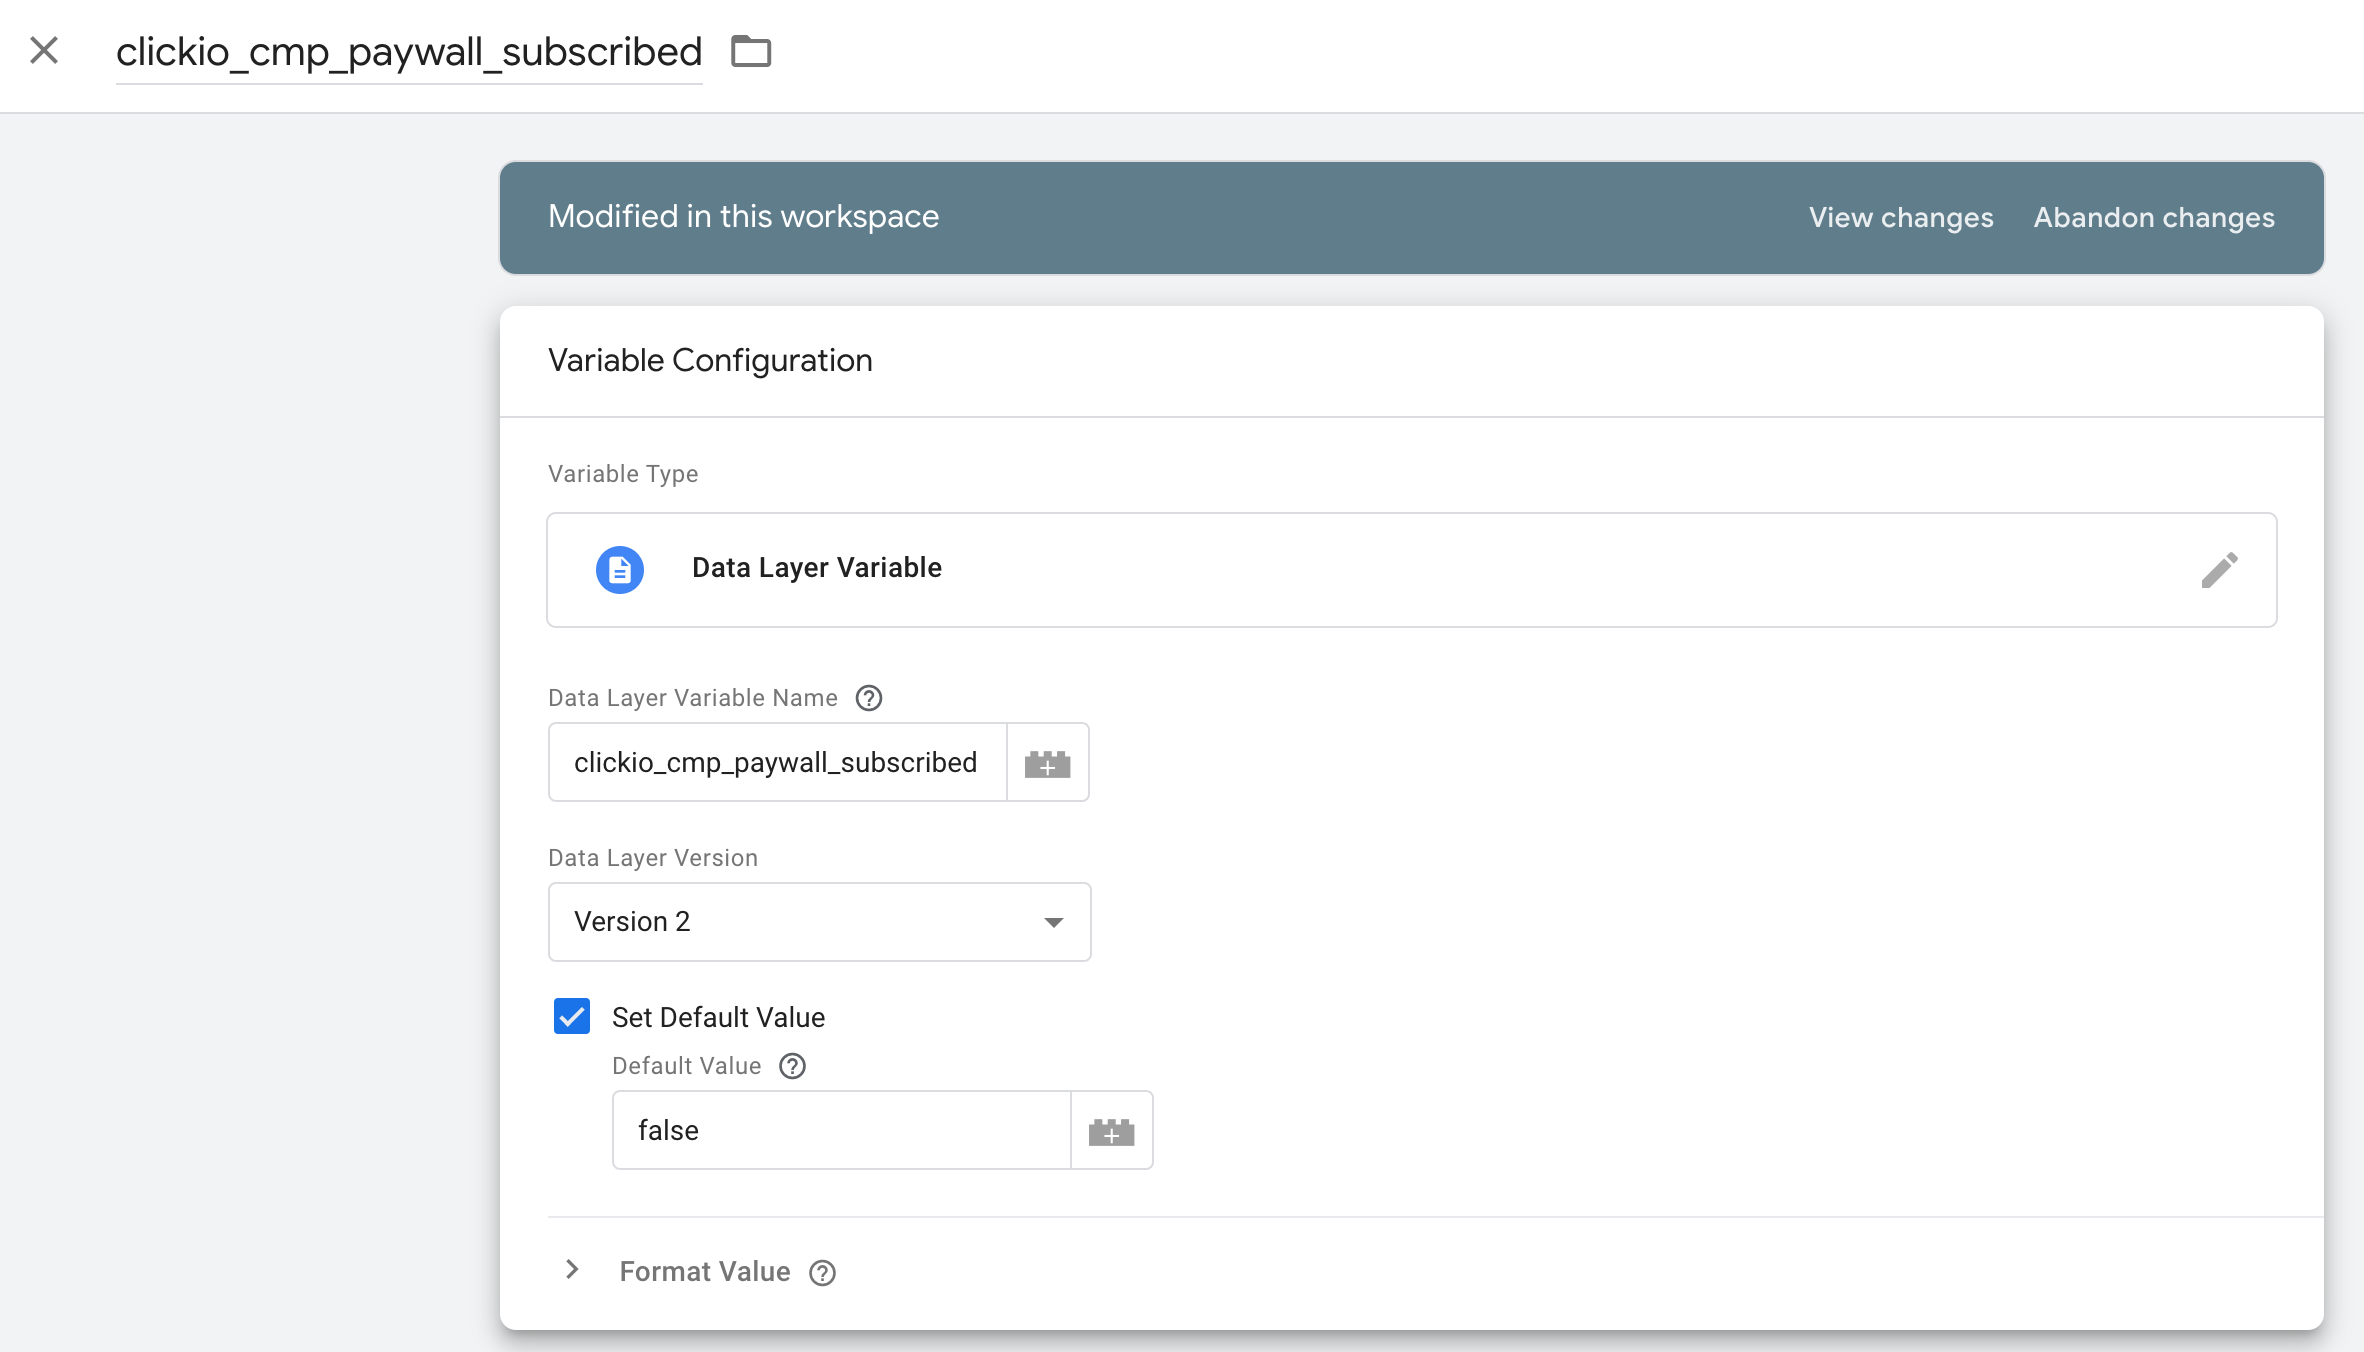
(Optional) Repeat previous steps to add another clickio_cmp_paywall_subscribed custom variable
This variable useful if you already using Built-in Cookie Paywall or Paywall integration and you need to trigger your tags based on user subscription status.
Set option "Set Default Value > Default Value" to false
2. Create Custom Triggers
You must create a separate trigger for each tag that requires individual consent checks.
Create triggers that respond to the clickio_consent_update event.
clickio_consent_update event is fired by Clickio CMP under the following circumstances:
- There is a change in consent states.
- After the page loads, reflecting any previously stored consent decisions.
Steps to set up the trigger:
- In the GTM dashboard, go to "Triggers" and click "New".
- Choose "Custom Event" as the trigger type.
- Set the event name to
clickio_consent_update. - Select "This trigger fires on > Some Custom Events"
- You will need to set up firing rules based on the dataLayer variables you previously created. These variables store consent states or other conditions relevant to your setup. For
clickio_cmp_data, please use the 'contains' match logic and include only one key:value search per rule. See the detailed description below. - Rename your trigger; we recommend adding the Tag or Vendor names for which you want to use this trigger.
- Save the trigger.

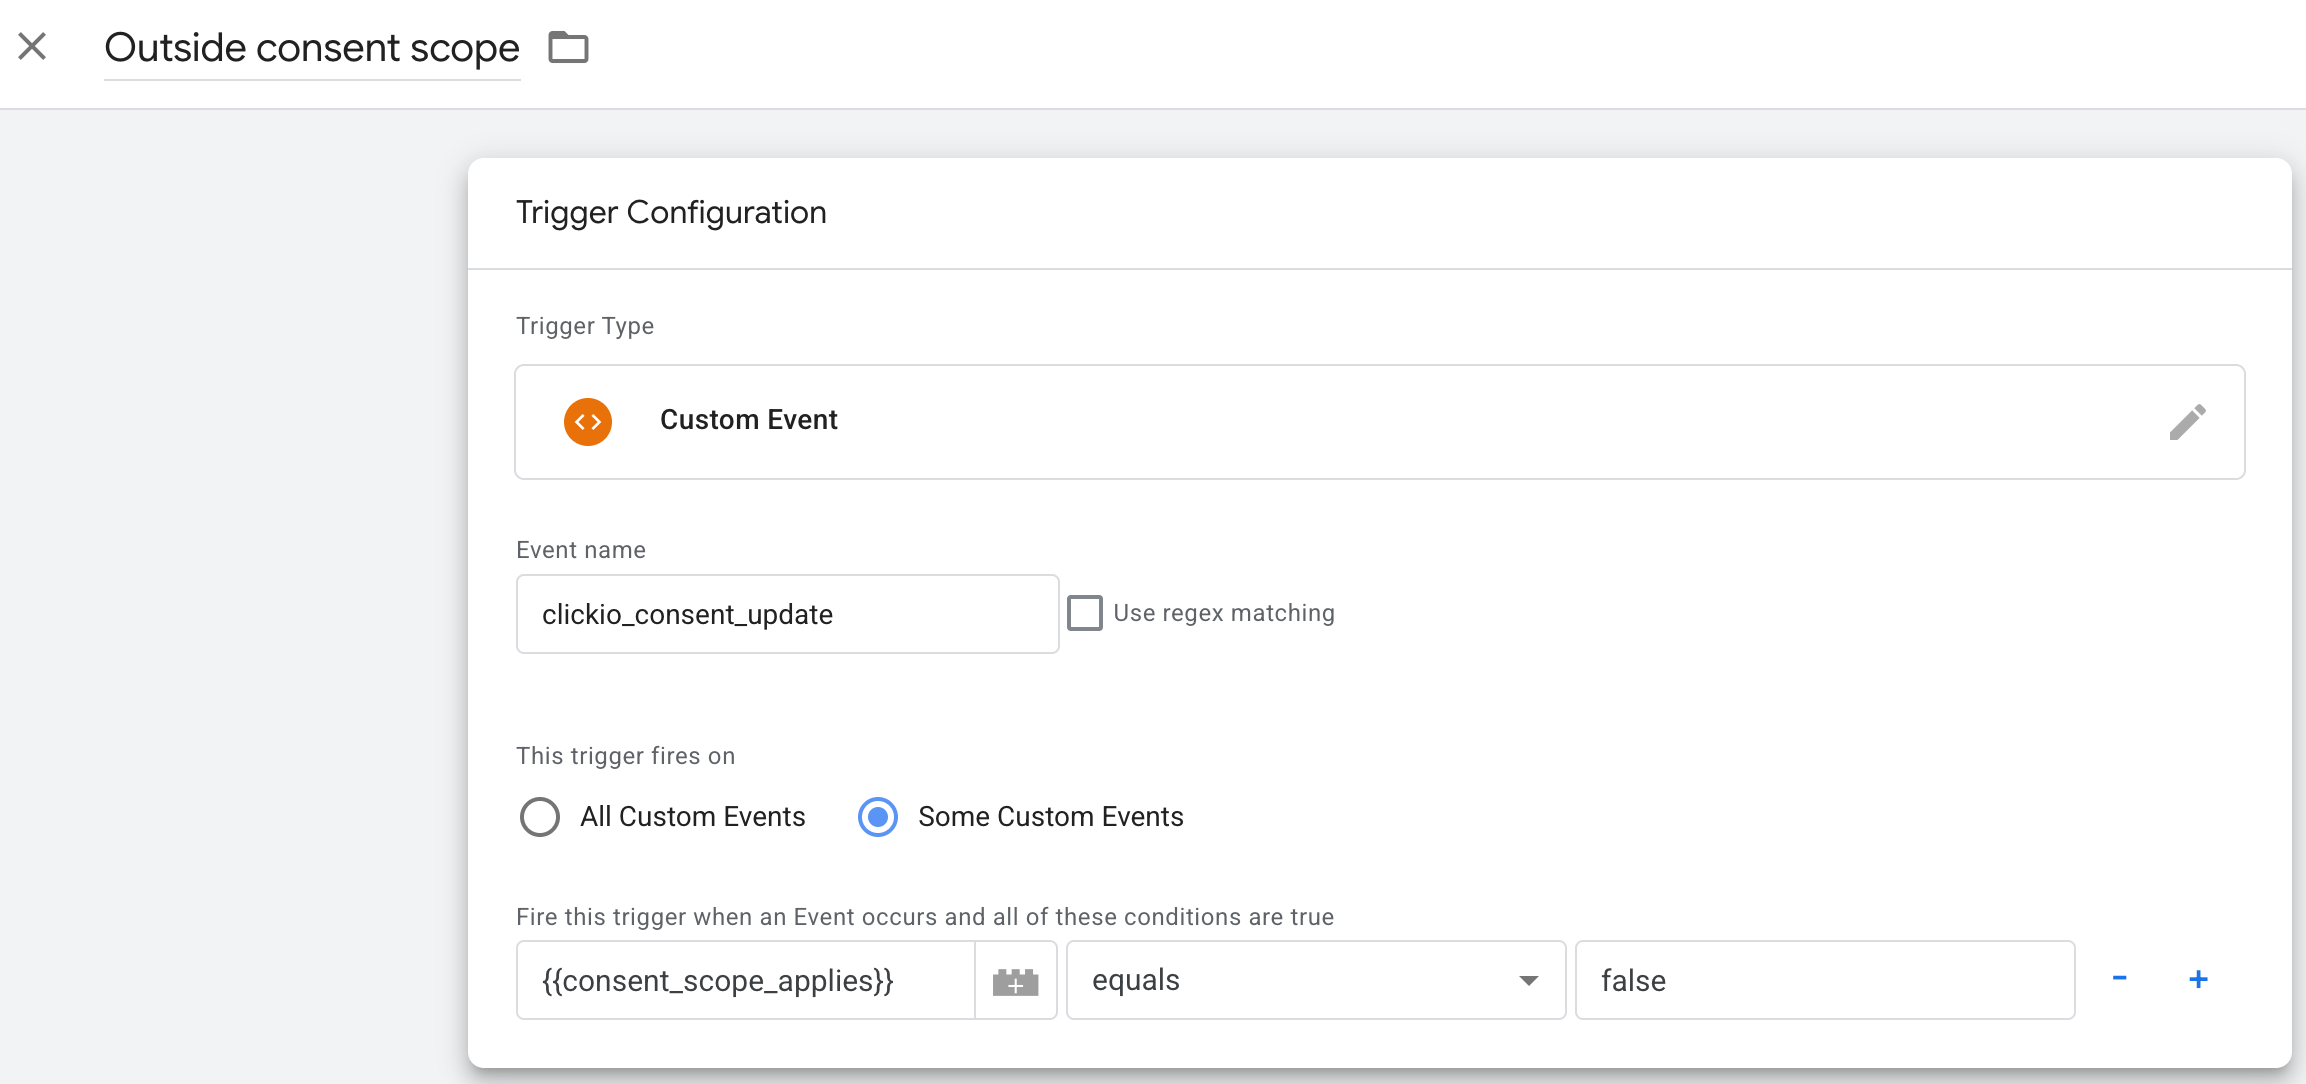
(Optional) Create a separate Trigger to bypass consent checks for non consent-scope users
Only if your setup includes the "Consent Scope: Only EEA, UK, and CH users" mode, please complete this steps:
- In the GTM dashboard, go to "Triggers" and click "New".
- Choose "Custom Event" as the trigger type.
- Set the "Event name" to
clickio_consent_update - Select "This trigger fires on > Some Custom Events"
- Add a rule
consent_scope_applies equals false. See details about this variable below. - Save the trigger.
Understanding Clickio dataLayer variables
clickio_cmp_data
It is a complex string that includes various consent states for different vendors and purposes.
It typically contain string like this, where each key after the colon represents a specific non-TCF Vendor ID or non-TCF Purpose ID or additional data:
other-vendor-consent:1,other-vendor-consent:2,other-vendor-li:1,other-vendor-li:2,nontcf-purpose-consent:1,nontcf-purpose-consent:2Full list of available keys:
| Name | Value | Description |
other-vendor-consent |
non-TCF vendor ID - corresponds to a specific vendor. | Available only in Clickio CMP TCF mode. Indicates whether the user has granted consent to specific non-TCF vendor |
other-vendor-li |
Legitimate Interest ID - corresponds to a specific non-TCF vendor's Legitimate Interest | Available only in Clickio CMP TCF mode. Represents the Legitimate Interest (LI) for non-TCF vendors. LI is a legal basis under GDPR allowing processing of personal data without explicit consent under certain conditions. |
nontcf-purpose-consent |
non-TCF Purposes ID - corresponds to a specific Standard non-TCF Purposes. | Shows user consent for specific Standard non-TCF Purposes that do not align directly with standard TCF purposes. |
custom-purpose-consent |
Custom purpose ID - corresponds to a specific custom purpose. | Custom purpose can be managed via the Purposes tab in the consent settings. |
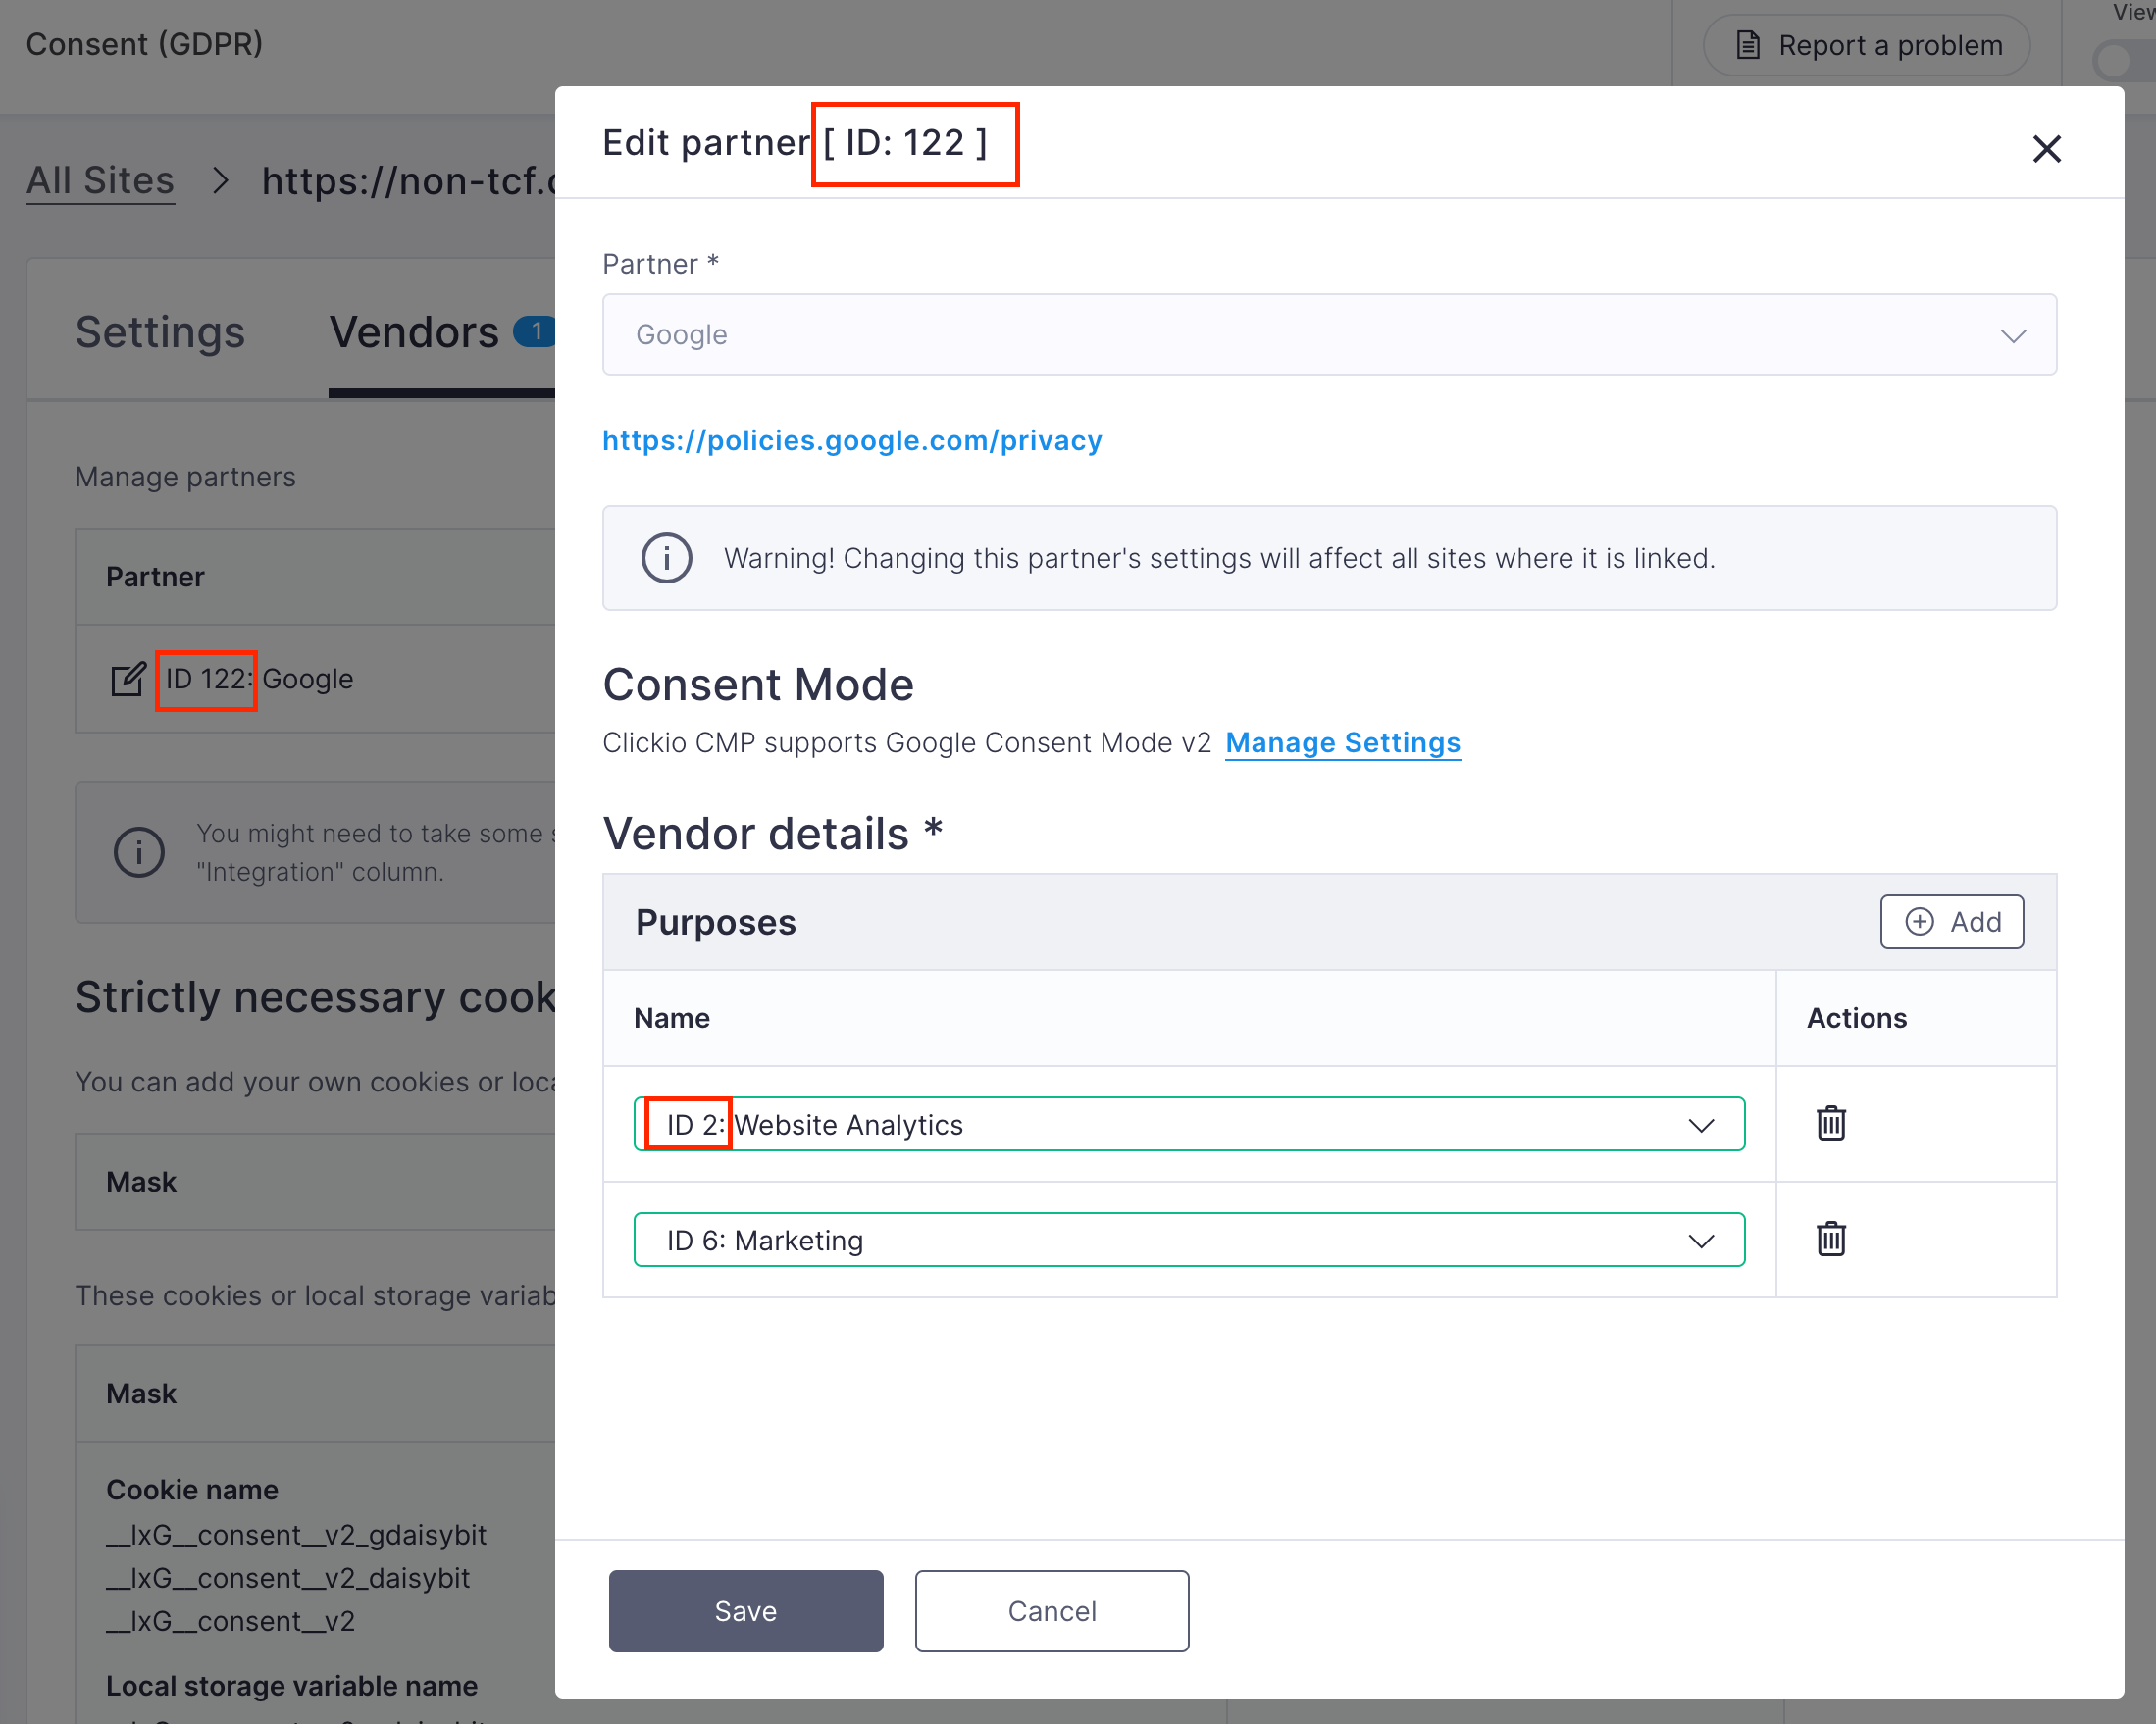
You can get all required IDs at the Clickio Platform:
- For Clickio CMP TCF mode - in the "Consent (GDPR) > yoursite.com > Vendors > Other" section
- For Clickio CMP non-TCF mode - in the "Consent (GDPR) > yoursite.com > Vendors" section
clickio_cmp_paywall_subscribed
This variable is available for use if you have implemented the Built-in Cookie Paywall or Paywall integration on your site. It reflects whether the user has subscribed to the paywall service. Its value can be considered in your triggers to check the user's subscription status as needed.
Values:
- true - Indicates that the user is an active paywall subscriber.
- false - Indicates that the user does not have an active subscription or is not a subscriber.
consent_scope_applies
If your setup includes the "Consent Scope: Only EEA, UK, and CH users" mode, the consent-scope-applies variable can be very helpful. It allows you to bypass consent checks for users outside these specific areas. By using this variable, you can adjust your tag firing logic to be contingent on the user's geographical location, thereby optimizing the implementation of consent-related configurations.
Values:
- true - Indicates that the user is from a consent-scoped country.
- false - Indicates that the user is from outside the designated consent scope.
3. Grouping Triggers for Complex Tag Management
Sometimes, a single tag might need to meet multiple conditions before firing. Grouping triggers can be beneficial in these cases.
Steps to group triggers:
- Create a trigger, based on
clickio_consent_updateevent, as described above. - Go to "Triggers" and click "New" to create a new trigger group.
- Add the relevant triggers to the group. For example, you can combine the trigger based on
clickio_consent_updateevent with another trigger, such as a Form Submission trigger, depending on your specific requirements. - Set the trigger group to fire only when all conditions in the group are met.
- Set the trigger group name
- Save the trigger group
4. Change Triggering of your Tags
Ensure that you apply these changes to all tags that don’t support TCF or Advanced Consent Mode
-
Log in to your GTM account, go to the "Tags" section, and select the tag you need to modify.
- At the bottom of the tag configuration page, you'll find the "Triggering" section. Click on it to edit the tag's trigger settings. Remove the existing trigger.
Add the previously created trigger, based onclickio_consent_updateevent
or a Trigger Group that includes your existing trigger and the trigger based onclickio_consent_updateevent.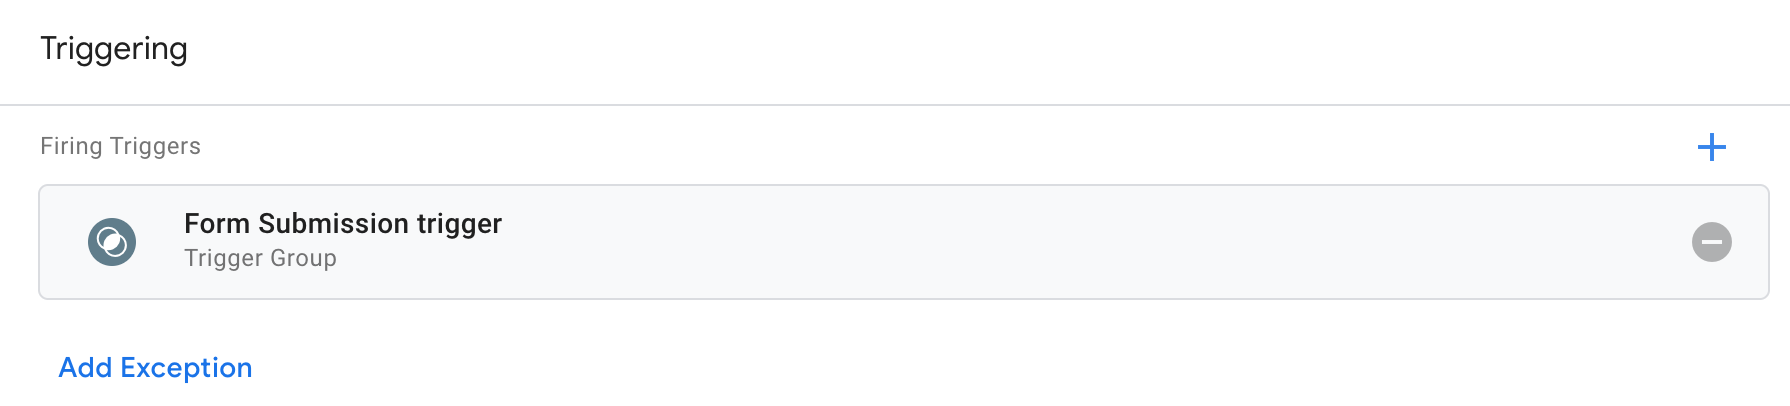
- (Optional) If your setup includes the "Consent Scope: Only EEA, UK, and CH users" you need to add additional trigger for users outside consent scope to bypass consent checks.
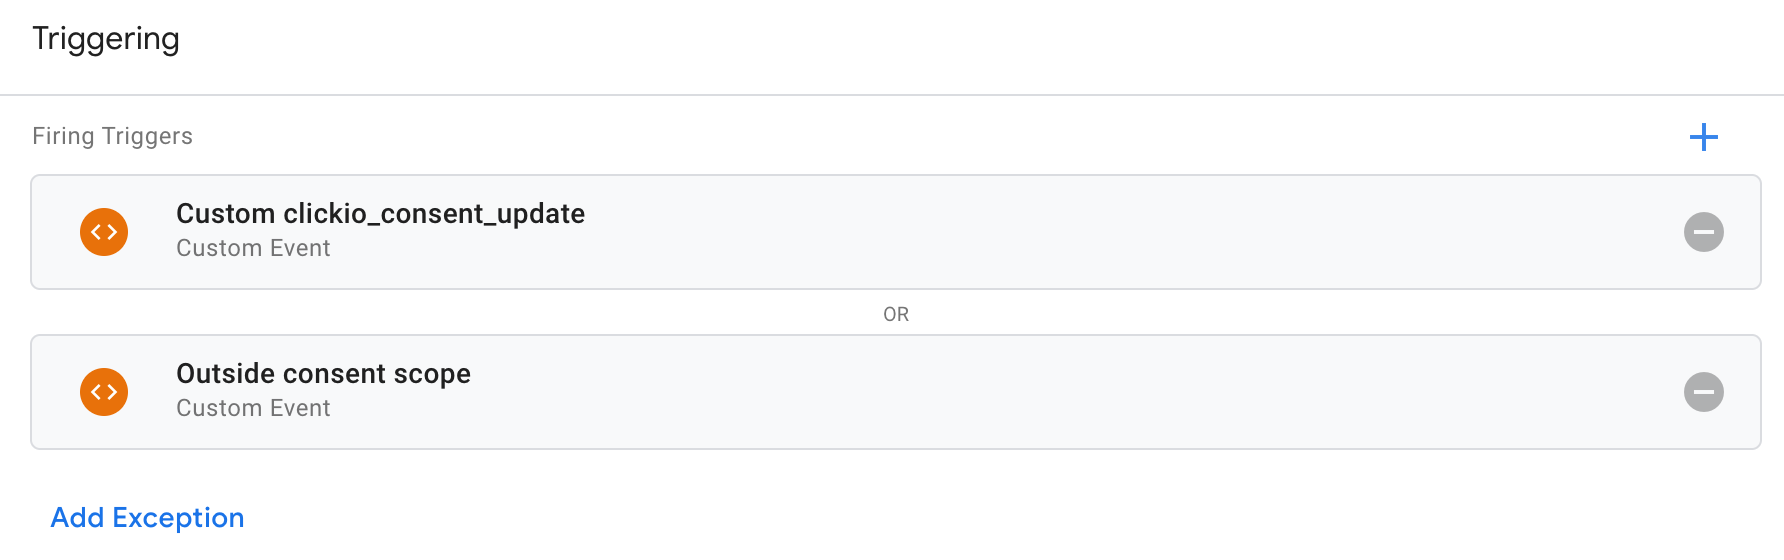
- Save your tag configuration.
- Use GTM's preview mode to test the modified tag thoroughly. This step is crucial to ensure that the tag behaves as expected under various consent scenarios.
- Once satisfied with the setup and the outcome of your tests, publish the changes in GTM to apply the modifications to your live website.

